Thursday, January 23, 2020

G Suite Admin: Search Drive for Shared Files

Quick Sharing Check Users Can Do to Audit Google Drive

Technology administrators are often focused on what they can configure at the admin level to protect or limit users from dangers that lurk in our ever connected world.  One thing, often overlooked, is the need for the actual 'user' to take steps to protect themselves and others.  For schools using G Suite, there is often gaps in training or protocols to ensure that users are sharing responsibly to protect themselves and others, especially the privacy of students.  Schools and districts that are lucky enough to work with security consultants, like RTM Communications, are provided guidance in this area as part of conducting a technology audit.

One thing that everyone can do today, is have users conduct a quick sharing check to ensure they are not sharing things to the public or with everyone in the 'domain' that are best set to private or shared only with specific and authorized viewers.    Key things to be on the lookout for are any item that would reveal private information about a student such as special education services or discipline referrals, for example.

These are the steps to follow to evaluate your shared files:
  1. Open Drive (drive.google.com)
  2. Select the dropdown in the search field at the top to set specific search criteria.
  3. Under 'Owner' select 'Owned by Me'
  4. Under 'Location,' select 'Visible in 'mydomain'
  5. Select 'Search'


Here is a video that goes a bit further to explain how to modify the share settings should you need instructions for that.


If you have questions or want to inquire about bringing G Suite training to your organization, please feel free to DM me on Twitter or email me.    For security audit and network support, contact RTM Communications.  


Tuesday, January 14, 2020

G Suite Admin: Turn On 2 Step Verification for Users

Privacy and security are at the top of the list of concerns for any technology admin no matter what organization they manage.  The G Suite Admin panel has many security options available to help keep data and users protected from phishing, malware and more.  

One security option that is becoming increasingly popular to deploy is two step verification (2SV).  Many people already have used 2SV in their daily lives to reset passwords for bank and other personal accounts and may want to have the option to turn it on for their G Suite account.  It adds an extra layer of security to your user accounts managed via the Google Admin Control Panel by making users enter a verification code (in addition to user name and password when they sign in to their account).   Many tech experts recommend that you require it for all users but that is entirely your choice.  I'll share with you how to configure it in the G Suite Admin panel.  


'Allow Users' to Turn On 2 Step Verification in the G Suite Admin Panel


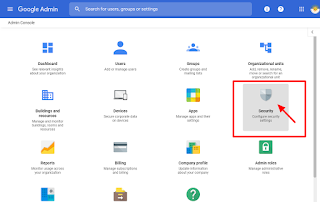
1.  Sign into admin.google.com & select the Security option.


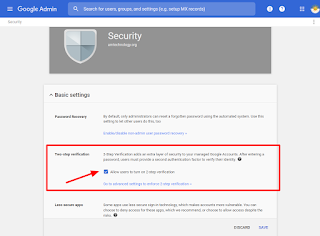
2.  Under Basic Settings, select 'Allow Users to Turn on 2 Step' & select Save.


How Users Turn On 2 Step Verification (Individual Accounts)


1.  Users select 'manage account' from the 'Google Account' menu (top right corner)


2.  Select Security & then 2 Step Verification to Turn it on.


Once the user gets that far, it is pretty intuitive.    In the Admin Panel you can modify it, there are several options.  If you are looking to make it 'available' to users without 'forcing' it upon them, these steps will do the trick.  

For more information, check out the support article from Google, 'Protect your Business with 2 Step Verification.'    If you have been using this, you might want to check out the update they posted in March 2019.  


Thursday, January 9, 2020

Libary Catalog Ninja ~ An 100% Guaranteed Online Scavenger Hunt with Google Forms

I was recently talking with a colleague who has been a librarian for years and is pretty tech savvy but I discovered they were still using PAPER and PENCIL for their library orientation activities so I shared this idea to use Google Forms, Data Validation & Quiz Mode.   Basically, I set up a form with a series of questions and turned on 'Data Validation' for each answer so that the student have to enter the correct answer for each question in order to submit the form.  It reduces apathy and they all win!  They all are guaranteed a 100%.   

You can do this as an online (catalog and library website) search, physical library space or a combination of both.  This concept can be applied to ANY curriculum area, age level, audience, etc.   Leverage the tools you already have! Forms has these great features built in and Response Validation and Sections are underutilized by teachers!  

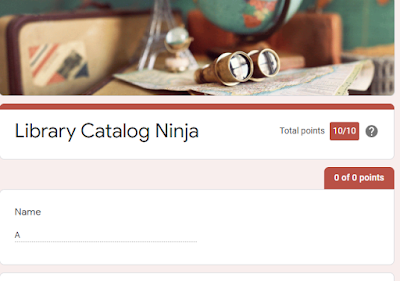
The 'Library Catalog Ninja' (shown below) is broken into sections so the actual questions do not appear until the students have signed in.  This is where you can add a 'password' to get into the hunt and change it for each class to keep the questions more secure.  However, this is so much fun and not high stakes that students rarely feel compelled to 'share.' 

Section / Page 1 to enter Name & Passcode (when applicable)
 

Google Form Quiz example for library
Page/Section 2 with all of the required questions.

How to Create Your 100% Guaranteed Quiz

1.  Go to forms.new to create a new Form.

2.  Add your questions.  I suggest you ask name, add a passcode question (if applicable) first and then insert a section and add all the quiz questions in section 2.  This keeps them from appearing on the main page until the student enters the quiz code.  


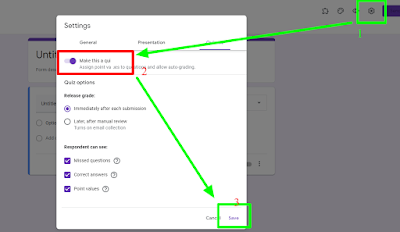
3.  Turn on Quiz (in settings)


4.  For each question, select the drodown in the bottom right corner and turn on Response Validation.  Then add the criteria such as 'is equal to 311.12'  Be sure to put 'something' in the hint or the hint will tell the student the correct answer!  


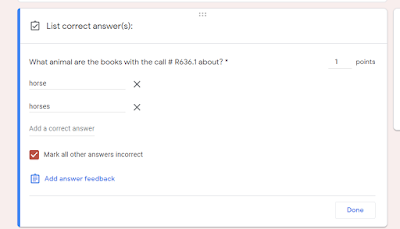
5.  Edit your answer key and enter the correct answers.  


6.  Try it out yourself until it works seamlessly, it's easy to make small mistakes.


7.  The best way to share this is through Google Classroom.  In fact, you can save a lot of time and steps if you create it IN Google Classroom in the first place.  Just open your class and go to the Classwork page.  Then, add a Quiz assignment.  The form will be linked right there you can open and edit.  You will not have to turn on th quiz feature as it will already be enabled for you.