I am still receiving requests for this information.
So often, we hear about updates to Google Apps and assume they will just work. Unfortunately, many features don’t function properly until the necessary settings are adjusted in the Google Workspace Admin panel.
Google Classroom is now widely used for professional development and training. Teachers are enrolling in courses at outside colleges and universities that use Google Classroom, and many districts have students attending individual classes from other schools.
Select the EDIT icon. There you will find the options to modify access for those who can join classes in your domain, and which classes users in your domain can join.
About AM Technology
I have been providing training & administrative support for all things Google Workspace since 2011. Learn more at amtechnology.org
Privacy is one of the biggest concerns for any technology admin no matter what the organization. Increasingly, I am asked basic questions about configuring the Google Workspace Admin panel and here is one of the most basic and popular email 'security' settings.
Today's topic is an easy fix that many admin's already have well established, but for those of you with it on your 'to do' list, I will share with you how to set up that footer for all organizational emails called the 'Confidentiality Disclaimer.' These disclaimers often read something like this:
CONFIDENTIALITY NOTICE -- This email is intended only for the person(s) named in the message header. Unless otherwise indicated, it contains information that is confidential, privileged and/or exempt from disclosure under applicable law. If you have received this message in error, please notify the sender of the error and delete the message. Thank you.
or
The Right-To-Know Law provides that most e-mail communications, to or from SAU XYZ employees regarding the business of the School District, are government records available to the public upon request. Therefore, this e-mail communication may be subject to public disclosure. This e-mail is intended solely for the person or entity to which it is addressed and may contain confidential and/or privileged information. Any review, dissemination, copying, printing, or other use of this e-mail by persons or entities other than the addressee is strictly prohibited. If you receive this e-mail in error, please notify the sender immediately and delete the material from any computer. For information about SAU#XYZ, visit sauxyz.xyz
This is a practice that has been considered 'best' for years yet you can always find a debate on whether or not has any legal weight, if it is effective or essentially ridiculous. For most of us, we see that is as simple as due diligence or an effort to protect privacy. It's also easy. I'll just show you simply how to add it. Before you begin, make sure you have your email disclaimer drafted and approved by administration. Use the boiler plate above or you can find resources like these by doing a simple search. 1. Sign into your Admin Panel 2. Select Apps from the Dashboard
3. Select G Suite 4. Select GMail 4. Select Advanced Settings
5. Select the OU
6. Scroll to the 'Append Footer' section, hover and select 'Configure' Tip: Whenever I have trouble finding what I am looking for on a page in the admin panel, I use CTRL + F to search for the term. It works like a charm! 7. Name, add, edit & save.
8. Edit or Copy to Another OU
Any thoughts, advice or a sample compliance footer you would like to share? Do you use a different footer for students vs. teachers? Just add to the comments below.
Sources:
Adam, et al. “Company-Wide Automatic Email Signatures in G Suite (Google Apps).” Mail, 15 May 2017, www.mail-signatures.com/articles/company-wide-automatic-email-signatures-in-google-apps/.
Anderson, Ryan. “A Confidential Talk About Those Email Disclaimers: Filevine Blog.” Filevine, 28 June 2019, www.filevine.com/blog/about-those-email-disclaimers/.
Cenkus, Brett. “Email Confidentiality Disclaimers: Annoying But Are They Legally Binding?” Cenkus Law, 1 Dec. 2017, cenkuslaw.com/annoying-email-confidentiality-disclaimers/.
Woodruff, Steve, et al. “Ridiculous Email Disclaimers.” Without Bullshit, 16 Oct. 2015, withoutbullshit.com/blog/ridiculous-email-disclaimers.
On September 1, 2021, the Google EDU Admin console enabled age-based settings which requires some updates for teachers, administrators and other adults to maintain access to ALL services.
Most EDU domains are set up with organizational units that clearly separate students from adults so this change is easy to update. If your under and over 18 accounts are not already in separate organizational units you will need to do that first or set up an over18 group.
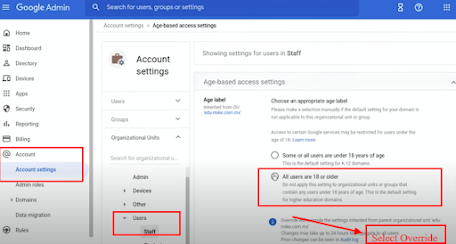
Account Settings for Over 18
To complete the steps for setting age based access settings:
Log into admin.google.com
Select Account
Select Account Settings
Scroll down to 'Age Based Access Settings'
Select the OU that is 'over 18' such as STAFF or TEACHERS.
Select All users are 18 or over
Select 'Override'
Repeat as needed for all over 18 groups.
Additional Services for Over 18
In Additional Google Services you will need to modify the setting as well.
Select Apps
Select Additional Google Services
At the top you will see a notification 'Access to additional services without individual control for all organizations units is turned OFF.
Select 'Change'
Select your Over 18 Organizational Units
Change Service status to 'On'
Select 'Override'
Creating Over18 Group
If you do not have your users set up in separate Organizational Unit, do that first. If you cannot easily change your OU's to separate under and over 18, you can set up a GROUP for over 18 users.
Select Directory
Select Group
Select 'Create Group'
Name it '18Older'
Set permissions
Group Members (deselect View members, View conversations & Publish posts)
Deleselect 'Contact Owners' under 'Entire Organization'
Set Who can Join to 'Only Invited Users'
Set the 'Allow members outside your organization' to OFF
Add your members to the Over18 group (Select group & select the ADD button)
Tip! You can add Classroom Teachers, Staff Lists etc to the group.
Once the group is set up repeat the steps at the top to configure this group to access the over 18 settings.
Watch this video for step by step tutorial:
Questions
What if we use Active Directory Sync?
Visit goo.gle/gcds for steps to address ADS with this new change.
We use GAM and have many OU's.
Visit goo.gle/gam for documentation on how to configure the age based settings with GAM updates.
What if I need more information?
If you need additional assistance or information, just visit the Google Help Center at goo.gle/compliance-help
Quick Sharing Check Users Can Do to Audit Google Drive
Technology administrators are often focused on what they can configure at the admin level to protect or limit users from dangers that lurk in our ever connected world. One thing, often overlooked, is the need for the actual 'user' to take steps to protect themselves and others. For schools using G Suite, there is often gaps in training or protocols to ensure that users are sharing responsibly to protect themselves and others, especially the privacy of students. Schools and districts that are lucky enough to work with security consultants, like RTM Communications, are provided guidance in this area as part of conducting a technology audit. One thing that everyone can do today, is have users conduct a quick sharing check to ensure they are not sharing things to the public or with everyone in the 'domain' that are best set to private or shared only with specific and authorized viewers. Key things to be on the lookout for are any item that would reveal private information about a student such as special education services or discipline referrals, for example. These are the steps to follow to evaluate your shared files:
Open Drive (drive.google.com)
Select the dropdown in the search field at the top to set specific search criteria.
Under 'Owner' select 'Owned by Me'
Under 'Location,' select 'Visible in 'mydomain'
Select 'Search'
Here is a video that goes a bit further to explain how to modify the share settings should you need instructions for that.
If you have questions or want to inquire about bringing G Suite training to your organization, please feel free to DM me on Twitter or email me. For security audit and network support, contact RTM Communications.
Privacy and security are at the top of the list of concerns for any technology admin no matter what organization they manage. The G Suite Admin panel has many security options available to help keep data and users protected from phishing, malware and more. One security option that is becoming increasingly popular to deploy is two step verification (2SV). Many people already have used 2SV in their daily lives to reset passwords for bank and other personal accounts and may want to have the option to turn it on for their G Suite account. It adds an extra layer of security to your user accounts managed via the Google Admin Control Panel by making users enter a verification code (in addition to user name and password when they sign in to their account). Many tech experts recommend that you require it for all users but that is entirely your choice. I'll share with you how to configure it in the G Suite Admin panel.
'Allow Users' to Turn On 2 Step Verification in the G Suite Admin Panel
1. Sign into admin.google.com & select the Security option.
2. Under Basic Settings, select 'Allow Users to Turn on 2 Step' & select Save.
How Users Turn On 2 Step Verification (Individual Accounts)
1. Users select 'manage account' from the 'Google Account' menu (top right corner)
2. Select Security & then 2 Step Verification to Turn it on.
Once the user gets that far, it is pretty intuitive. In the Admin Panel you can modify it, there are several options. If you are looking to make it 'available' to users without 'forcing' it upon them, these steps will do the trick. For more information, check out the support article from Google, 'Protect your Business with 2 Step Verification.' If you have been using this, you might want to check out the update they posted in March 2019.
I was recently talking with a colleague who has been a librarian for years and is pretty tech savvy but I discovered they were still using PAPER and PENCIL for their library orientation activities so I shared this idea to use Google Forms, Data Validation & Quiz Mode. Basically, I set up a form with a series of questions and turned on 'Data Validation' for each answer so that the student have to enter the correct answer for each question in order to submit the form. It reduces apathy and they all win! They all are guaranteed a 100%. You can do this as an online (catalog and library website) search, physical library space or a combination of both. This concept can be applied to ANY curriculum area, age level, audience, etc. Leverage the tools you already have! Forms has these great features built in and Response Validation and Sections are underutilized by teachers! The 'Library Catalog Ninja' (shown below) is broken into sections so the actual questions do not appear until the students have signed in. This is where you can add a 'password' to get into the hunt and change it for each class to keep the questions more secure. However, this is so much fun and not high stakes that students rarely feel compelled to 'share.'
Section / Page 1 to enter Name & Passcode (when applicable)
Page/Section 2 with all of the required questions.
How to Create Your 100% Guaranteed Quiz
1. Go to forms.new to create a new Form. 2. Add your questions. I suggest you ask name, add a passcode question (if applicable) first and then insert a section and add all the quiz questions in section 2. This keeps them from appearing on the main page until the student enters the quiz code.
3. Turn on Quiz (in settings)
4. For each question, select the drodown in the bottom right corner and turn on Response Validation. Then add the criteria such as 'is equal to 311.12' Be sure to put 'something' in the hint or the hint will tell the student the correct answer!
5. Edit your answer key and enter the correct answers.
6. Try it out yourself until it works seamlessly, it's easy to make small mistakes.
7. The best way to share this is through Google Classroom. In fact, you can save a lot of time and steps if you create it IN Google Classroom in the first place. Just open your class and go to the Classwork page. Then, add a Quiz assignment. The form will be linked right there you can open and edit. You will not have to turn on th quiz feature as it will already be enabled for you.
As a seasoned Google Certified Trainer I have seen thousands of GMail Inboxes with 1K+ unread messages and clearly no organized approach to managing email. Over the years, I have applied some successful strategies to managing my GMail inbox to achieve what is often referred to as 'inbox zero.' The best place to begin is by selecting the right inbox. I use a different inbox type for my teacher/business account than my personal GMail account and in this post I will outline both, why and how I leverage these tools.
Priority Inbox for Work / School Email
In 2010, Google introduced 'priority inbox' and this was a life saver for me in making sure I was ultra responsive to student, parent and client requests. Rather than having all emails coming in (by default) in chronological order of 'unread' messages, priority inboxs has three sections on the inbox home page:
Important & Unread
Starred
Everything Else
The important emails (ones coming directly to me from a specific person (not promos or list servs), arrive at the top of the page and everthing else (promos, list servs, etc) go to the bottom. Basically if it doesn't need my immediate attention, it's pushed and grouped at the bottom of the page.
Making Priority Inbox Work
Each time I visit my email I addresss the top of the page, the important and unread and act upon as many as I can. Once I read them, they will be moved to the collection of email at the bottom of the page.
At the end of the day or at a time when I am performing email clean up, I make the goal to have nothing on the page but 'starred.' My important and unread is empty and at the bottom of the page is 'everything else.' I go through and do a final act upon those emails by ether 'starring' them which placed them in the middle section of the inbox as 'starred' meaning they need to be acted upon but not right now. The other option is to create a TASK with a due date from the email and then archive it. With the Artificial Intelligence feature 'Nudge' built in I worry less about archiving emails because GMail will bring emails BACK to my inbox a few days later asking if I still need to do something with it.
Priority Inbox (circa 2010)
Enable Priority Inbox
By selecting Priority Inbox your email will be 'instantly' reorganized. You'll probably be shocked at some 'unread' messages you completely missed by not having it enabled. To enable it, just hover over the word 'Inbox' in the top left of your inbox and select Priority from the dropdown list.
Inbox Tabs (Categories) for Personal GMail
In 2012 Google introduced a 'Tabbed (category) Inbox' which creates separate tabs as categories in your GMail inbox separating email by the following:
Primary - messages from people you know
Social - notificiations from Google Plus, YouTube, Pinterest, Twitter, LinkedIn etc
Most people register for social media, household accounts, shopping, mailing through their personal GMail account so the amount of email can be substantial between all of the activity one person is involved with online. The categories are perfect keeping your important 'conversations' on the primary tab and grouping social media in one tab (which I mostly just select all and delete periodically), and easily see through color coded notifications if an 'update' comes in while working through your primary messages.
Meet Gmail's Tabbed (Category) Inbox (circa 2012)
Enable Tabbed Inbox (now referred to as 'Default)
To enable tabs for the first time, go to the gear and select 'Configure Inbox.' Initially, select all the categories to see how your messages get bundled. You can go back later and remove categories you don't want.
You can also 'train' both priority and tabbed inbox. If GMail marks a message important you don't think is important, just remove the 'importance market' and future emails matching that will not be flagged important. If using categories, drag emails to the category you would prefer they were in and GMail will ask if you would like to recategorize all future messages that match.
There are loads of 'learn to code' resources on the web but it can be difficult to find something you can put to work right away to teach yourself or others. A while back I dove deep into the MIT AppInventor site to build an Intro to Apps course for middle school. I have presented a portion of it as one or a series of sessions at the AppsEventsSummitsFeel free to use the presentation as it has directions for building two simple apps using the AppInventor interface on a Chromebook or Laptop. You can also install the MIT Companion App on your Android & sync it run/test the app as you build.
The sense of accomplishment and motivation you get from this is similar to what you might get coding 'tangibles' but with no cost or space requirements. Everything is FREE you just need devices.
Slides for Learning or Facilitating
This slide deck you can follow the directions or facilitate a workshop. In less than an hour you can code 'Hello Purr' and 'Magic Ball' which both young and old seem to get really psyched about when they see it work.
FAQ's
Q. Are there any network requirements? A. Yes, you need to be on the same WIFI and it cannot block network traffic. I've had trouble presenting this at some schools and had to have everyone connect to my own mobile wifi.
Q. What if I don't have Android devices to test on? A. There is an install for an 'emulator' you can put on your 'computer' which puts a little phone screen on your desktop that will since with the program and you can test it out that way.
Q. Is there an IOS version? A. Yes, there is a new program called Thunkable that you can work with, I don't have the directed posted for the above through Thunkable but you should check it out. It's free.
If you do this and want to have some more fun, level up and make the PONG App! The directions can be found at allisonmollica.com > Presentations > My First Android App at the bottom of the page. Happy Coding!
Many teachers are finding themselves starting a new school year in a 1:1 Chromebook school or just beginning to use G Suite and haven’t necessarily had enough training to feel confident about leveraging and making best use of the Chromebooks or G Suite as classroom staples. In a fast paced world of leading learners, teachers need a quick and effective way to make best use of the Chromebooks & G Suite without losing ‘pace’ with what they already know how to do.
A fast and effective start is to experience how Google classroom works with a single assignment using the Google document. The powerful sharing, naming and organizing convention of this tool will put you on the fast track of leading learners, providing feedback and personalizing learning through a variety of instructional tools as well as options for demonstrating understanding. If you have never used Google Classroom before, use this ‘Getting Started Guide’ to help you.
Engage Your Students with a Simple Google Docs Assignment in Classroom
Google Classroom is a tool that is amazing for organizing, naming and auto sharing documents, slides, sheets & more between you and your students. Even if you don’t plan to use Classroom ‘often’ it is still worth creating a class and having every student enrolled as this alone will allow you to interact seamlessly with other apps.
Create an assignment asking students to create a document and provide a writing prompt or a series of tasks to research about the upcoming course (what do you know, answer a few questions, write about your goals for the school year, etc). The key is you want them to be able to engage in writing that will be of value to the start of the course or school year for a good portion of the first class or hour.
When students arrive to class, invite your students to the class or join by code.
Ask students to open the assignment and begin contributing the document.
While they are working, click the folder icon on the assignment in classroom, open all of their documents in one browser window.
The students will see that you are ‘in their document’ and will immediately be more engaged in their task. This is an excellent opportunity to practice the ‘compliment, coach and encourage’ technique through the use of comments. Find something first to complement on in each document to help build trust and a positive working relationship. If they seem stymied, offer help.
Bonus option: Install the Tab Cloud Chrome Extension. Save the open documents as a tab set that you can easily reopen later so you don’t have to go through the process of opening the documents again.
Create an assignment with a specific writing task and ask them to create a Document to complete or create a document for them and add it to the assignment, giving them each their own copy.
While they are all working open each document and provide feedback with a comment.
You can contact me on Twitter via @amollica or email me to inquire about bringing AppsEvents PD to your school or check out our upcoming PD www.appsevents.com
Google announced new Slides features on September 27th. I've highlighted some of the newest (and not as new but useful) features that teachers, learners, administrators can all benefit from knowing about! The video playlist at the bottom (broken into short intro's and how to's) include the following:
Keep Notepad Now you can insert a note from Keep directly in Google Slides. This can be good for notes, images, drawings (from mobile) and items you've collected using the Save to Keep Chrome Extension. As students use keep more and more they will find these integrations invaluable.
Insert Diagram New addition ~ diagrams templates you can add and modify directly from the Insert Menu. Diagram options include Hierarchy, Timeline, Process, Relationship and Cycle.
Insert Chart Not as new but seriously useful. You can insert a chart and modify data from scratch. Most of the time, however, we have collected data and created charts that need to be included in presentations. On the Insert>Chart menu is the option to Insert>Chart>FROM SHEETS. You can then search Drive for a specific sheet that has said charts. If you update the data in the sheet make sure you select the update chart button on the slide to accurately reflect the updates. AddOns & Explore Add Ons are now available for Slides. If you have not used Add On's before they have been available for Docs and Sheets for a while now. They provide 'added functionality / features' by selection. On the Slides menu you will find a link now to Add On's. Click on Get Add Ons to explore the 'marketplace' of free offerings. In the video I demonstrate the Unsplash Photos and Icons by Noun Project. A not as new feature (Fall 2016) is the Explore tool for slide formatting. In the video I highlight using it with the Unsplash Photos to quickly format a nice looking slide. These are two unbelievable features that will make any slide creator more efficient and happy.
Android coming to Chromebook has been talked about for over a year now. It is now here and ready for you to use in your Edu Domain! It is in BETA mode but it is VERY FUNCTIONAL and if you have a compatible Chromebook (running Chrome 53 or later) you can configure your domain to put a 'PLAY' store of APPS available to your teachers and students.
Here are the steps to set up Android in Admin Domain for Chromebooks.
In short, you need to login to admin.google.com. Go to Device Management > Chrome Devices and then select Android Applications. Next, accept the Android for Work Agreement. When that is enabled you can select and configure Android Apps.
Click to Configure the Apps. Click on the + sign to shop for the apps. Select an app you want to make available to your students. Once you APPROVE it you need to CONFIGURE IT! If you don't configure it then it won't show up in their SCHOOL PLAY STORE as an option.
When you configure the app you have a choice to Force Installation, Pin to Taskbar (which I recommend for Google Classroom, for example) BUT you can simply make a tool like Toontastic, WeVideo, etc as an install option.
Once you set up your store, you probably want to know what the user experience looks like. I've created a video below to show you how the student experiences the play store accessing and using apps. With the PLAY store app pinned to the student task bar they can open and see what is available in the store and install as needed: I would LOVE to hear your feedback! Are you as excited about the potential as I am? What will be your first apps to send out and how will this change how you are DBA at your school?
Hi everyone As usual, I am on the run but wanted to give a shout out to MULTIPLE CHROME ACCOUNTS! It is an essential skill (managing multiple accounts) if you have more than one Google account. However, many are still unaware how this works and are still logging into several Google accounts through one Chrome browser. There is NO EASY WAY to show a group of 50 beginner to seasoned Googlers how to sign into a separate Chrome account. Why? Well, so many are still signing into multiple 'gmail' accounts in a single Chrome account. Sounds confusing? It is. Well, here is a quick tip. 1. You want to sign into 'CHROME' for every gMail or Google account you have. 2. Before you do that for the first time, make sure you are only signed into one account. Quick check: If you click on your avatar in the top right, and see only one account, that is GOOD.
If you click on the avatar and you are signed into two accounts, BAD.
If you checked and the result is BAD.
Select each account and sign out. Then close Chrome.
Open Chrome.
Then, on the right hand side click on the Menu and go to Settings. Scroll down to Create Users.
At this point you can begin adding different users to Chrome.
If you need more help, visit: https://support.google.com/chrome/answer/185277?hl=en
I created this quick how to after I stumbled upon it searching for the function. I know many of you would say... duh, the function is a no brainer but I seem to have trouble with recall of these things if I don't use them often enough. This is an excellent add~on for Google Sheets if you need to split the text in columns (especially first name, last name) but not often enough to remember the function. :)
Last week I had the opportunity to work at the Josiah Bartlett Elementary School for 4 days. It was a hands on deck Google Apps for Education training for all grade levels K-8. The agenda included classroom integration, teacher and administration training, website development and more. Each day was a small tornado of activity and I am just beginning to feel grounded and able to reflect on everything we did.
I will highlight some of the Google Apps experiences we had but first I want to give a shout out to the Bernerhof Inn (http://www.bernerhofinn.com/), absolutely the nicest place I have stayed on my Google adventures and Margarita Grill (http://margaritagrillnh.com), most definitely the best flavored food I have eaten anywhere since I can remember. If you are within driving distance and looking for a 'getaway', stay at the Bernerhof and eat at the Margarita Grill. You cannot go wrong!
Josiah Bartlett Elementary School &
Town Library Under One Roof. Brilliant!
The Josiah Bartlett Elementary School culture is everything I would have wanted for my own children (who unfortunately attended a less than adequate school in their formative years). I found happiness and peace each day among all the students and staff. The level of respect and contentment is phenomenal. Learning happens naturally in a positive and supportive environment. There is fun and laughter. The administration is clearly supportive and encouraging. I couldn't help but think how wonderful it must be to attend that school and work with such an amazing group of people.
In four days, here are some of the great Googly things we did with the staff and students. If you are looking for ideas for using Google with specific grade levels you might find something interesting here.
8th Grade: Google Sites for Mount Washington Hike ~ Site Template. We were short on time with these kids but had enough time to have them create their own sites and start thinking about what their project focus would be. They would be going on a hike up Mount Washington and are asked to compare/contrast the Mountain to the Valley and/or identify how skills, equipment and information could improve a wilderness trip.
7th Grade: Lucid Press Designing Brochures on Web Evaluation & Greek Mythology
6th Grade: Google Sites for Trip to Ferry Beach ~ Site Template. We had enough time working with these students to show them how to change the header and background images in the site and add images to their pages. We also gave them a prompt to create a page and write what they are wondering about. They are leaving on a three day 'science & nature trip' and they learned site development while prompting them to think about their future experience!
5th Grade: Book Creator & Asus Transformer Tablets ~ 1 for every student in grade 5. We used the Google Edu Device Setup App and the 'bump' technology to deploy the tablets for students. Once that was in place we pushed out Google Slides, Sheets, Docs and Drive to the students and the Book Creator App. The next day, students crafted the content of an 'About Me' story in Google Docs and then began developing their book using the Book Creator App. This was a great way to get them acclimated with their new devices by engaging them in a topic they love most ~ themselves! They are also conducting Biome research using Google Documents, Research Tool and the Easy Bib Add on. Once this is complete they will create and publish their Biome Books to Google Books using the Book Creator App.
4th Grade: Google Classroom Writing Prompt ~ The teachers set up their classrooms in the morning and learned how to create a document and send it out to the students. These teachers were generally 'new' to using Google documents in the first place. Classroom is so easy they were using it with students in class that morning. The students accessed the writing prompt and started working and we showed the teacher how to access all the documents through classroom and provide formative feedback throughout the class period. Students were fired up about getting those comments in their documents and they were provoked to dig deeper or consider things they might not have otherwise. I am always amazed at how powerful the comment tool is in Google Docs and could see that both the students and teachers were as equally impressed!
3rd Grade: Google Classroom Writing Prompt ~ Like fourth grade, the 3rd grade teachers set up the writing prompt and pushed it out through Classroom. Piece of cake! When the students had to leave for UA and the teachers said they could leave their laptops in place as they would continue writing more when they returned a big 'yay' was heard in the room. One student said that Google Docs makes writing fun! I agree!
1-2 Grade: Google Draw of Coniferous and Deciduous Trees ~ This was their first time using Google at all and we were short on time so we created a Draw document and pushed it out to all of the students using Doctopus. Then while they conducted their morning meeting, Jimi logged them in and opened their Drive so they would be ready to get started. Draw is not like paint so they had to quickly learn some techniques to get what they needed on the paper without the flexibility of paintbrush for example. They were just beginning a unit on trees so they started with the Coniferous tree. We learned later that you could use the callout tool as a 'leaf' and with copy/paste they could make dozens of leaves and then place them around the page.
Kindergarten: Google Draw (Patterns) & Caterpillars. We used a 'caterpillar' drawing that we used as a template and used 'circles' to create the caterpillar body and we asked the kindergarten students to use the 'fill' tool to create a color 'pattern' on the caterpillar. Perfect setup for the curriculum topic and ability. Again, we used Doctopus to push it out.
With staff we further developed sites, calendars, use of Chrome and more.
I am amazed at everyone's energy, openness and willingness to work together and try new things. I'm in awe at what we all accomplished in four days.
Hat's off to the Josiah Bartlett Elementary School staff and students. You ARE the change we want to see in education and the world.
Here are some quick 'tips' for managing and using Classroom. Please note that there will be changes in classroom in the future so some of the things you are noticing or wishing for are being worked on. This post is based on classroom as of today, August 25, 2014! :)
Don't Delete the Classroom Group
Admins Beware ~ Do NOT delete the group in the admin panel for teachers. Several have done this and it there is no easy fix. You need this group so that teachers can create classrooms.
ReNaming a Class
Once you create a class in classroom it will create a Classroom folder in your Drive and a folder inside that with the name of your class. Students will have the same setup. If you 'rename' your class, it will not 'rename' the class folder in Drive (for now).
Using Forms
Yes you can post your 'Getting to Know You Survey's in Classroom.' You may want to post it as a link in your About Page, this way when new students arrive you can refer them to that easily without them having to scroll down the Stream to find it.
Using the About Page
The About Page is a great place to post all your related course resources ~ Link to your website, add your syllabus, Getting to Know You Survey, portfolio or project site templates and more. For the creative folks, if you have not already done so, consider creating a 'course trailer' and post to you Tube. Then you can add that as well! As of today you cannot sort or move around what you post on the About Page but I have found that you can create one post for Course Resources and add everything to that one post (as an 'option' for now). Assigning to more than one Classroom If you have several classrooms set up for the same course (example Biology Period 1, Biology Period 4), you can assign to all of the classrooms at the same time. Be sure to do this when you create the assignment as that option doesn't exist if you forget to do this and go into 'edit.' (again, I see this changing). Comment Stream ~ Icebreaker/prompt Starting a new topic or unit? Post a related YouTube video in the comment stream and post a question / prompt to get students thinking and provide some schema. Classroom as a Solution Many seasoned Google for Education users are quick to note the 'flaws' in Classroom and 'want more.' Just know that the feedback being provided is being monitored and you can expect 'upgrades' in the future. Classroom is an excellent workflow solution, especially for teachers that have had a difficult time managing sharing and accessing documents in Drive. Please show them a. How to set up Class b. How to 'push' a document out to each student. c. How to access those documents once students begin to work on them. d. How students submit them. e. How they grade and return the assignment. Focus on getting a consistent use of Google Documents (show the research tool and easy bib add on for research projects). With classroom, the ease of assigning, providing formative assessment and feedback as well as a final grade is great! Also, consider placing all assignment instructions on the document you push out to students and tell them to simply delete the instructions as they no longer need them and build their document. This way they work within only one document. You can consider showing them page break (to move the directions to the last page) or revision history (to restore the directions if they need to review). If you focus on what you CAN do with classroom you will have plenty to do with your students while those additional features are being developed! Here is a quick video I created that explains the newer features and demos the workflow in Classroom:
.png)