Wednesday, June 26, 2024
Monday, September 13, 2021
Admin Settings to Open Classroom to Outside your Domain
A quick post today, but really important one. So often we hear of updates to Google Apps and just take it for granted they will work. Unfortunately, many times a 'feature' doesn't work properly because it requires a modification in the Google Workspace ADMIN panel.
Google Classroom has become more widely used for professional development and training. Teachers are enrolled in classes at outside colleges and universities that are teaching with Google Classroom. Many districts have students coming in from other schools for only a few classes. This means that being knowledgeable of HOW to configure Classroom to allow users to join from outside your domain is very important!It requires that the Admin Settings in Classroom be modified to do this:
- Sign into admin.google.com
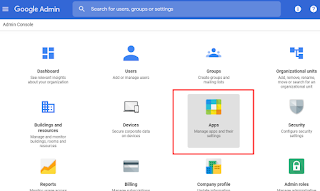
- Select Apps
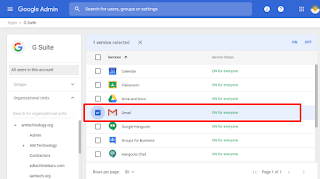
- Select Google Workspace>
- Select Classroom
- Select Class settings.
- Select the EDIT icon. There you will find the options to modify access for those who can join classes in your domain and what classes users in your domain can join.
About EdTrekkers
We provide professional development and training featuring
Google Workspace for both business & education as well as other educational topics. Please check out what we have to offer at edtrekkers.com. If you would like to inquire about professional development, email info@edtrekkers.com
Google Workspace for both business & education as well as other educational topics. Please check out what we have to offer at edtrekkers.com. If you would like to inquire about professional development, email info@edtrekkers.com

Wednesday, September 8, 2021
Google Workspace Admin: Set Confidentiality Disclaimer Footer
Privacy is one of the biggest concerns for any technology admin no matter what the organization. Increasingly, I am asked basic questions about configuring the Google Workspace Admin panel and here is one of the most basic and popular email 'security' settings.
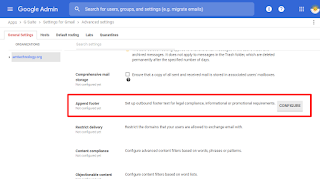
Today's topic is an easy fix that many admin's already have well established, but for those of you with it on your 'to do' list, I will share with you how to set up that footer for all organizational emails called the 'Confidentiality Disclaimer.' These disclaimers often read something like this:
Before you begin, make sure you have your email disclaimer drafted and approved by administration. Use the boiler plate above or you can find resources like these by doing a simple search.
1. Sign into your Admin Panel
2. Select Apps from the Dashboard
3. Select G Suite

4. Select GMail
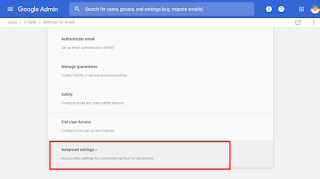
4. Select Advanced Settings
5. Select the OU

6. Scroll to the 'Append Footer' section, hover and select 'Configure'
Tip: Whenever I have trouble finding what I am looking for on a page in the admin panel, I use CTRL + F to search for the term. It works like a charm!
7. Name, add, edit & save.

Today's topic is an easy fix that many admin's already have well established, but for those of you with it on your 'to do' list, I will share with you how to set up that footer for all organizational emails called the 'Confidentiality Disclaimer.' These disclaimers often read something like this:
CONFIDENTIALITY NOTICE -- This email is intended only for the person(s) named in the message header. Unless otherwise indicated, it contains information that is confidential, privileged and/or exempt from disclosure under applicable law. If you have received this message in error, please notify the sender of the error and delete the message. Thank you.or
The Right-To-Know Law provides that most e-mail communications, to or from SAU XYZ employees regarding the business of the School District, are government records available to the public upon request. Therefore, this e-mail communication may be subject to public disclosure. This e-mail is intended solely for the person or entity to which it is addressed and may contain confidential and/or privileged information. Any review, dissemination, copying, printing, or other use of this e-mail by persons or entities other than the addressee is strictly prohibited. If you receive this e-mail in error, please notify the sender immediately and delete the material from any computer. For information about SAU#XYZ, visit sauxyz.xyzThis is a practice that has been considered 'best' for years yet you can always find a debate on whether or not has any legal weight, if it is effective or essentially ridiculous. For most of us, we see that is as simple as due diligence or an effort to protect privacy. It's also easy. I'll just show you simply how to add it.
Before you begin, make sure you have your email disclaimer drafted and approved by administration. Use the boiler plate above or you can find resources like these by doing a simple search.
1. Sign into your Admin Panel

2. Select Apps from the Dashboard

3. Select G Suite

4. Select GMail

4. Select Advanced Settings

5. Select the OU

6. Scroll to the 'Append Footer' section, hover and select 'Configure'
Tip: Whenever I have trouble finding what I am looking for on a page in the admin panel, I use CTRL + F to search for the term. It works like a charm!

7. Name, add, edit & save.
8. Edit or Copy to Another OU

Any thoughts, advice or a sample compliance footer you would like to share? Do you use a different footer for students vs. teachers? Just add to the comments below.
Sources:
Adam, et al. “Company-Wide Automatic Email Signatures in G Suite (Google Apps).” Mail, 15 May 2017, www.mail-signatures.com/articles/company-wide-automatic-email-signatures-in-google-apps/.
Anderson, Ryan. “A Confidential Talk About Those Email Disclaimers: Filevine Blog.” Filevine, 28 June 2019, www.filevine.com/blog/about-those-email-disclaimers/.
Cenkus, Brett. “Email Confidentiality Disclaimers: Annoying But Are They Legally Binding?” Cenkus Law, 1 Dec. 2017, cenkuslaw.com/annoying-email-confidentiality-disclaimers/.
Woodruff, Steve, et al. “Ridiculous Email Disclaimers.” Without Bullshit, 16 Oct. 2015, withoutbullshit.com/blog/ridiculous-email-disclaimers.
Thursday, September 2, 2021
New! Age Based Settings Google Edu Admin Update

Most EDU domains are set up with organizational units that clearly separate students from adults so this change is easy to update. If your under and over 18 accounts are not already in separate organizational units you will need to do that first or set up an over18 group.
Account Settings for Over 18
To complete the steps for setting age based access settings:
- Log into admin.google.com
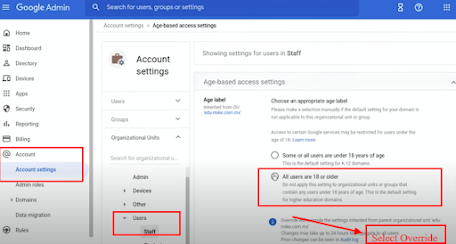
- Select Account
- Select Account Settings
- Scroll down to 'Age Based Access Settings'
- Select the OU that is 'over 18' such as STAFF or TEACHERS.
- Select All users are 18 or over
- Select 'Override'
- Repeat as needed for all over 18 groups.
Additional Services for Over 18
In Additional Google Services you will need to modify the setting as well.
- Select Apps
- Select Additional Google Services
- At the top you will see a notification 'Access to additional services without individual control for all organizations units is turned OFF.
- Select 'Change'
- Select your Over 18 Organizational Units
- Change Service status to 'On'
- Select 'Override'

Creating Over18 Group
If you do not have your users set up in separate Organizational Unit, do that first. If you cannot easily change your OU's to separate under and over 18, you can set up a GROUP for over 18 users.
- Select Directory
- Select Group
- Select 'Create Group'
- Name it '18Older'
- Set permissions
- Group Members (deselect View members, View conversations & Publish posts)
- Deleselect 'Contact Owners' under 'Entire Organization'
- Set Who can Join to 'Only Invited Users'
- Set the 'Allow members outside your organization' to OFF
- Add your members to the Over18 group (Select group & select the ADD button)
Tip! You can add Classroom Teachers, Staff Lists etc to the group.
Once the group is set up repeat the steps at the top to configure this group to access the over 18 settings.
Watch this video for step by step tutorial:
Questions
What if we use Active Directory Sync?
Visit goo.gle/gcds for steps to address ADS with this new change.
We use GAM and have many OU's.
Visit goo.gle/gam for documentation on how to configure the age based settings with GAM updates.
What if I need more information?
If you need additional assistance or information, just visit the Google Help Center at goo.gle/compliance-help
Thursday, January 23, 2020
G Suite Admin: Search Drive for Shared Files
Quick Sharing Check Users Can Do to Audit Google Drive
Technology administrators are often focused on what they can configure at the admin level to protect or limit users from dangers that lurk in our ever connected world. One thing, often overlooked, is the need for the actual 'user' to take steps to protect themselves and others. For schools using G Suite, there is often gaps in training or protocols to ensure that users are sharing responsibly to protect themselves and others, especially the privacy of students. Schools and districts that are lucky enough to work with security consultants, like RTM Communications, are provided guidance in this area as part of conducting a technology audit.One thing that everyone can do today, is have users conduct a quick sharing check to ensure they are not sharing things to the public or with everyone in the 'domain' that are best set to private or shared only with specific and authorized viewers. Key things to be on the lookout for are any item that would reveal private information about a student such as special education services or discipline referrals, for example.
These are the steps to follow to evaluate your shared files:
- Open Drive (drive.google.com)
- Select the dropdown in the search field at the top to set specific search criteria.
- Under 'Owner' select 'Owned by Me'
- Under 'Location,' select 'Visible in 'mydomain'
- Select 'Search'

Here is a video that goes a bit further to explain how to modify the share settings should you need instructions for that.
If you have questions or want to inquire about bringing G Suite training to your organization, please feel free to DM me on Twitter or email me. For security audit and network support, contact RTM Communications.
Tuesday, January 14, 2020
G Suite Admin: Turn On 2 Step Verification for Users
Privacy and security are at the top of the list of concerns for any technology admin no matter what organization they manage. The G Suite Admin panel has many security options available to help keep data and users protected from phishing, malware and more.
One security option that is becoming increasingly popular to deploy is two step verification (2SV). Many people already have used 2SV in their daily lives to reset passwords for bank and other personal accounts and may want to have the option to turn it on for their G Suite account. It adds an extra layer of security to your user accounts managed via the Google Admin Control Panel by making users enter a verification code (in addition to user name and password when they sign in to their account). Many tech experts recommend that you require it for all users but that is entirely your choice. I'll share with you how to configure it in the G Suite Admin panel.
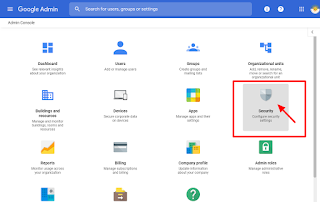
1. Sign into admin.google.com & select the Security option.
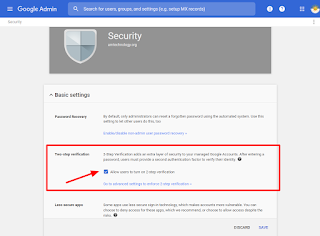
2. Under Basic Settings, select 'Allow Users to Turn on 2 Step' & select Save.
1. Users select 'manage account' from the 'Google Account' menu (top right corner)

2. Select Security & then 2 Step Verification to Turn it on.

Once the user gets that far, it is pretty intuitive. In the Admin Panel you can modify it, there are several options. If you are looking to make it 'available' to users without 'forcing' it upon them, these steps will do the trick.
For more information, check out the support article from Google, 'Protect your Business with 2 Step Verification.' If you have been using this, you might want to check out the update they posted in March 2019.
One security option that is becoming increasingly popular to deploy is two step verification (2SV). Many people already have used 2SV in their daily lives to reset passwords for bank and other personal accounts and may want to have the option to turn it on for their G Suite account. It adds an extra layer of security to your user accounts managed via the Google Admin Control Panel by making users enter a verification code (in addition to user name and password when they sign in to their account). Many tech experts recommend that you require it for all users but that is entirely your choice. I'll share with you how to configure it in the G Suite Admin panel.
'Allow Users' to Turn On 2 Step Verification in the G Suite Admin Panel

2. Under Basic Settings, select 'Allow Users to Turn on 2 Step' & select Save.

How Users Turn On 2 Step Verification (Individual Accounts)

2. Select Security & then 2 Step Verification to Turn it on.

Once the user gets that far, it is pretty intuitive. In the Admin Panel you can modify it, there are several options. If you are looking to make it 'available' to users without 'forcing' it upon them, these steps will do the trick.
For more information, check out the support article from Google, 'Protect your Business with 2 Step Verification.' If you have been using this, you might want to check out the update they posted in March 2019.
Thursday, January 9, 2020
Libary Catalog Ninja ~ An 100% Guaranteed Online Scavenger Hunt with Google Forms
I was recently talking with a colleague who has been a librarian for years and is pretty tech savvy but I discovered they were still using PAPER and PENCIL for their library orientation activities so I shared this idea to use Google Forms, Data Validation & Quiz Mode. Basically, I set up a form with a series of questions and turned on 'Data Validation' for each answer so that the student have to enter the correct answer for each question in order to submit the form. It reduces apathy and they all win! They all are guaranteed a 100%.
You can do this as an online (catalog and library website) search, physical library space or a combination of both. This concept can be applied to ANY curriculum area, age level, audience, etc. Leverage the tools you already have! Forms has these great features built in and Response Validation and Sections are underutilized by teachers!
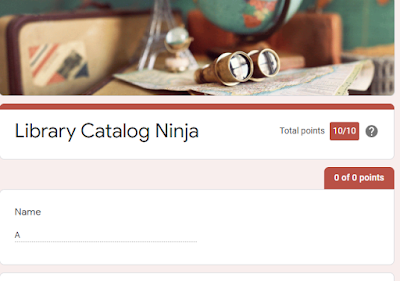
The 'Library Catalog Ninja' (shown below) is broken into sections so the actual questions do not appear until the students have signed in. This is where you can add a 'password' to get into the hunt and change it for each class to keep the questions more secure. However, this is so much fun and not high stakes that students rarely feel compelled to 'share.'
2. Add your questions. I suggest you ask name, add a passcode question (if applicable) first and then insert a section and add all the quiz questions in section 2. This keeps them from appearing on the main page until the student enters the quiz code.

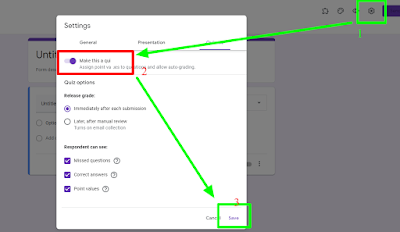
3. Turn on Quiz (in settings)
4. For each question, select the drodown in the bottom right corner and turn on Response Validation. Then add the criteria such as 'is equal to 311.12' Be sure to put 'something' in the hint or the hint will tell the student the correct answer!

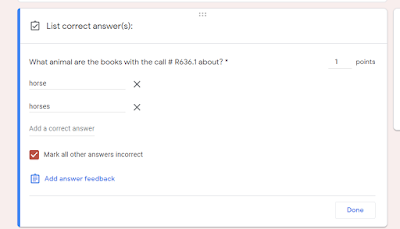
5. Edit your answer key and enter the correct answers.
6. Try it out yourself until it works seamlessly, it's easy to make small mistakes.
7. The best way to share this is through Google Classroom. In fact, you can save a lot of time and steps if you create it IN Google Classroom in the first place. Just open your class and go to the Classwork page. Then, add a Quiz assignment. The form will be linked right there you can open and edit. You will not have to turn on th quiz feature as it will already be enabled for you.
You can do this as an online (catalog and library website) search, physical library space or a combination of both. This concept can be applied to ANY curriculum area, age level, audience, etc. Leverage the tools you already have! Forms has these great features built in and Response Validation and Sections are underutilized by teachers!
The 'Library Catalog Ninja' (shown below) is broken into sections so the actual questions do not appear until the students have signed in. This is where you can add a 'password' to get into the hunt and change it for each class to keep the questions more secure. However, this is so much fun and not high stakes that students rarely feel compelled to 'share.'
 |
| Section / Page 1 to enter Name & Passcode (when applicable) |
 |
| Page/Section 2 with all of the required questions. |
How to Create Your 100% Guaranteed Quiz
1. Go to forms.new to create a new Form.2. Add your questions. I suggest you ask name, add a passcode question (if applicable) first and then insert a section and add all the quiz questions in section 2. This keeps them from appearing on the main page until the student enters the quiz code.

3. Turn on Quiz (in settings)

4. For each question, select the drodown in the bottom right corner and turn on Response Validation. Then add the criteria such as 'is equal to 311.12' Be sure to put 'something' in the hint or the hint will tell the student the correct answer!

5. Edit your answer key and enter the correct answers.

6. Try it out yourself until it works seamlessly, it's easy to make small mistakes.

7. The best way to share this is through Google Classroom. In fact, you can save a lot of time and steps if you create it IN Google Classroom in the first place. Just open your class and go to the Classwork page. Then, add a Quiz assignment. The form will be linked right there you can open and edit. You will not have to turn on th quiz feature as it will already be enabled for you.
Subscribe to:
Posts (Atom)